How to Preview a Haircut With AI Before You Commit
Learn how to preview a haircut with AI using better photos, precise prompts, reference images, and a realism check before visiting the salon.

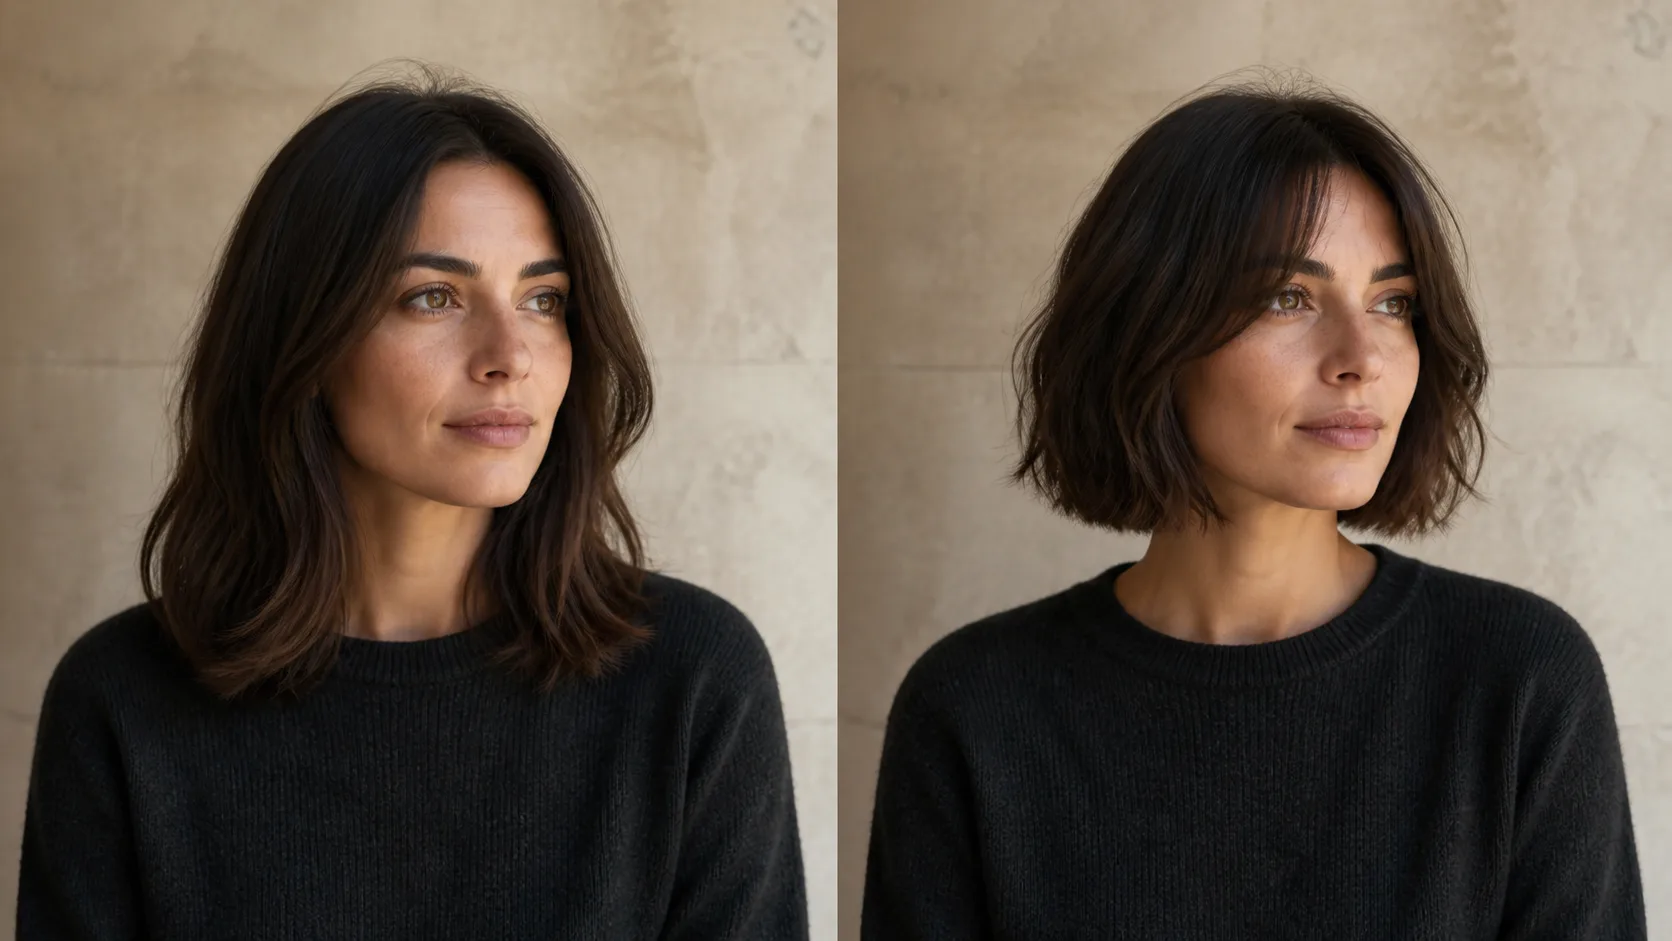
An AI haircut preview is most useful as a rejection tool. It can quickly show that blunt bangs overwhelm your face, that a shorter silhouette feels right, or that copper is less convincing than you imagined. It cannot tell you whether your hair will hold that shape after a humid commute or how much daily styling the cut requires.
That distinction makes the workflow much more reliable: use AI to narrow the visual direction, then take a few controlled references to a stylist who understands your real hair.
Start with a photo that reveals the problem
The generator needs to see both your identity and the boundaries of your current hair. A flattering photo is not automatically a useful one. Portrait mode blur, a dramatic side angle, or a tight crop can hide exactly the information the model needs.
Use a source photo that passes this checklist:
- Your face is sharp, front-facing, and close to eye level.
- The full top, sides, and ends of your hair are inside the frame.
- The hairline and both sides of the face are visible.
- Soft, even light separates dark hair from the background.
- There is only one person in the image.
- No hat, heavy filter, hand, or large accessory covers the hair.
- The photo reflects how you look now.
Stand near a window, face the light, and leave a little space around your head and shoulders. If dark hair disappears into a dark wall, move in front of a lighter neutral background. If very light hair blends into a bright wall, choose a slightly darker one.
Once the source passes those checks, you can preview a haircut or hair color on your own photo with either a written description, a reference hairstyle, or both.
Use two photos for two different jobs
Your portrait answers, "Who should remain unchanged?" The hairstyle reference answers, "What should change?" Treating them as separate jobs prevents a common mistake: choosing a reference because you like the person's entire appearance rather than because the haircut is documented clearly.
A useful hairstyle reference has:
- A similar viewing angle to your portrait
- A complete view of the cut, including the crown and ends
- Enough resolution to distinguish layers, texture, and fringe
- Lighting that reveals the silhouette rather than hiding it
- Minimal obstruction from hands, hats, or oversized collars
For a complex cut, use more than one reference from the same hairstyle: front, side, and back. Mixing three different cuts creates conflicting instructions. A front view may imply a chin-length bob while a second image shows long layers and a third has a disconnected undercut. The result can look polished without matching any of them.
References also need to be physically relevant. Loose waves photographed on dense hair may still help communicate length and part placement, but they do not prove that the same finish is achievable on every texture. Use the image to define the visual target, not as a guarantee.
Describe the haircut like a consultation, not a mood board
"Make my hair stylish" leaves nearly every decision to the model. A better prompt identifies the parts of the cut that determine its silhouette.
Describe these five elements when they matter:
- Length: pixie, jaw-length, collarbone-length, shoulder-length, or a specific point on the body.
- Shape: blunt perimeter, rounded shape, shag, tapered sides, stacked back, or long layers.
- Front detail: center part, side part, curtain bangs, micro bangs, face-framing pieces, or exposed forehead.
- Texture and finish: straight, loose waves, defined curls, coily, air-dried, smooth blowout, or deliberately tousled.
- Color placement: solid shade, face-framing highlights, balayage through the ends, darker roots, or a narrow streak.
For example:
Collarbone-length blunt lob with a center part, soft face-framing pieces beginning below the cheekbones, natural dark brown color, and a lightly air-dried finish. Keep my face, hairline, clothing, background, and lighting unchanged.
For a shorter cut:
Low taper on the sides and back, about 5 cm of textured length on top, natural hairline, no hard part, matte finish. Do not change my facial hair, head shape, skin tone, or ears.
These prompts are specific without pretending to replace a stylist's technical plan. Terms such as "collarbone-length" and "below the cheekbones" also survive visual interpretation better than subjective words such as "medium" or "flattering."
Change one variable per round
If you change the cut, color, texture, part, makeup, and lighting together, you will not know which change made the result work. Start with the haircut while keeping your current color and approximate texture. Then test color on the best silhouette.
A controlled sequence might look like this:
- Generate the same collarbone-length cut with no color change.
- Compare a blunt version with a lightly layered version.
- Keep the stronger shape and test a center part against a side part.
- Only then compare two realistic colors.
Save the results side by side. A single image can feel exciting because it is new; a controlled comparison reveals whether the haircut itself is doing the work.
Do not generate twenty unrelated options. Four deliberate variants are easier to judge than a wall of random hairstyles.
Run the realism check before you trust the mirror
AI can produce attractive hair that is badly attached to the person. Enlarge each result and inspect the transitions, not just the overall impression.
Check the following areas:
- Hairline: Does it follow the original forehead, or has the forehead become shorter or wider?
- Temples and ears: Are strands passing naturally around them, or has an ear changed shape or disappeared?
- Part and crown: Does the hair appear to grow from a plausible point?
- Neck and shoulders: Do the ends sit in front of or behind clothing consistently?
- Shadow: Does the new fringe cast a shadow that agrees with the scene's light?
- Identity: Are face shape, eyebrows, skin tone, age, and expression unchanged?
- Texture: Do curls or waves have believable variation, rather than repeating like a pattern?
Reject a preview if it quietly narrows the jaw, enlarges the eyes, changes the forehead, or adds makeup. Those alterations can make a haircut seem more flattering than it would be on your actual face.
Also compare the hair volume with your starting point. A generator may add density to create a clean silhouette. That can be inspiring, but it is not evidence that your hair will produce the same volume without extensions, styling, or a different cut.
Judge shape before color
Color is visually loud, so it can distract from a weak haircut. Convert the previews to grayscale or briefly cover the hair color with your hand while comparing them. Ask whether the length, width, fringe, and part still work.
Then evaluate color under more than one assumption. The generated shade is influenced by the source photo's white balance and lighting. Warm indoor light can make brown appear copper; a cool phone photo can mute golden tones. Use the preview to choose a color family, not to approve an exact salon formula.
If a preview persuades you to dye your hair at home, follow the product instructions and safety warnings rather than treating the generated image as guidance. The U.S. Food and Drug Administration advises a skin patch test before every hair-dye use, along with gloves, careful timing, and keeping dye away from the eyes. An image generator cannot assess allergy risk or chemical compatibility.
Turn the winning preview into a salon brief
Do not hand over one AI image and say, "Make it exactly like this." Bring a compact evidence set:
- Your preferred AI preview
- The original hairstyle reference from at least two angles
- One rejected variation and the reason you rejected it
- A current unedited photo of your own hair in natural light
- A short list of non-negotiables, such as keeping enough length to tie it back
Then ask the stylist three practical questions:
- Which parts of this shape are realistic for my density, growth pattern, and texture?
- What will it look like air-dried rather than salon-styled?
- How often will the fringe, fade, layers, or color need maintenance?
This is where the preview becomes useful. It gives both of you a concrete starting point while leaving room for professional judgment. The stylist may recommend a longer fringe, less dramatic layering, or a different color process to preserve hair condition. That is not a failure to match the AI; it is the translation from image to real material.
Know when the preview is not enough
An AI hairstyle preview is good for comparing visible direction: shorter versus longer, bangs versus open forehead, warm versus cool color, smooth versus textured finish.
It is weak at predicting:
- How hair behaves after washing or in humidity
- The time and tools required for daily styling
- Whether a fringe separates around a cowlick
- How bleach or chemical processing will affect condition
- Exact density, shrinkage, curl response, or extension requirements
- The back view when no back reference was provided
If those factors determine whether you will enjoy the haircut, discuss them before booking the full service. A conservative first cut or temporary color may be a better experiment than asking an image to settle the decision.
FAQ
Can AI show what haircut would suit me?
AI can show how different lengths, parts, fringes, textures, and colors change your visible appearance. It cannot reliably determine which cut fits your maintenance routine or how your hair will behave, so use the result to shortlist options rather than declare a winner.
What photo works best for a virtual hairstyle try-on?
Use a recent, sharp, front-facing portrait in soft light. Include the full hair outline, keep the hairline visible, and avoid hats, filters, tight crops, or a background that blends into your hair.
Should I use a prompt or a hairstyle reference image?
A prompt is useful for simple changes and controlled comparisons. A reference image is better for a specific cut, while combining both lets you identify what to copy and what to adjust. For complex styles, use multiple angles of the same haircut.
How can I stop AI from changing my face?
Start with a clear portrait and explicitly ask to preserve facial features, face shape, skin tone, expression, clothing, background, and lighting. Compare the source and result at the same size, and reject any version that changes identity even if the hairstyle looks good.
Is an AI hair color preview accurate?
It is useful for comparing broad color families and placement, but screen color, lighting, your starting shade, and the real dye process all affect the outcome. Take the preview to a colorist for interpretation rather than treating it as an exact formula.
Try it
Run your own prompt in the generator
Pick a model, run one prompt, and compare the results side by side. New accounts start with free credits.
AI Headshot Generator From Photo: A Realistic Workflow
Choose the right source photo, style, crop, and identity checks to create an AI headshot that looks polished without looking like someone else.
AI Age Progression Guide: See Yourself Older or Younger
Learn how AI age progression works, what photo to upload, and how to create realistic older, younger, baby, or life-stage portraits.